SEMI-HOMEMADE HALLOWEEN COSTUMES

Although I'm big on planning, sometimes I do wait until the last minute. And sometimes, those crunch times, have had the most creative end results. Case in point: deciding at the last minute to dress-up for Halloween. My friend Rebeca plans her costume like Macy's plans their parades - the year before (that's just how much she LOVES Halloween). I love it too, but sometimes I just need to be in the mood. For those times that I did get in the mood, it was from seeing the potential in some of those $10 and $20 costumes hanging in a store. Just like with a room, it's the accessories that can pull a look together....

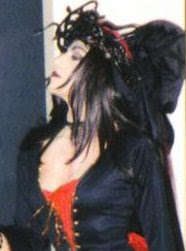
SERPENTINE SORCERESS


This lovely little dress I found at WALGREEN'S for only $9.99.
I jazzed it up with a wig I got at a salon... and yes - me and my sticks. I spray painted a branch black, attached some shredded black fabric, a large snake, and some faux red stones...


I made a crown from a grapevine wreath I spray painted black and
wove in a few black fake snakes (with beady red eyes) and a whole-lotta black fine tulle for drama. I had cut the wreath (in the back) so it would fit snug on my head. The tulle also helped cover the opening.


I wish I had a photo of Becky's costume. She had beaded a chest plate and black platform boots (her own - not from a costume). And although she doesn't have kids, she always like to host and decorate the courtyard for an apartment building party. It was a great way to get to know the neighbors and the kids stayed safe and had fun being close to their home. Afterwards, we'd head down to Lincoln Road on South Beach and see the carnival of costumes to go clubbing... Although this costume was only 9.99, I was able to wear it a few times....

I had even wore this to work and walked the store saying:
"SELL SELL SELL OR I'LL CAST A SPELL!!!" lol

Last year, while in Big Lot's getting some supplies for the Halloween party, I spotted a cute black costume with coppery details for only $19.99...

THE LEGEND OF AVENTURA


 Again, accessories played a part in pulling a look together.
I love having some kind of prop (and yes - a stick). I knew I had some copper leaves and small skulls I had used to make a door wreath the year before, so I took it apart to use for the costume...


I weaved in some of the copper leaves into the Amy Weinhouse wig I got at Party City. I also used the leaves on my prop. I painted a Styrofoam skull black and stuck it on the end of the stick...


My black ruched boots worked withe the ruffle details and I added some of my own black beaded accessories. This was a scary site around 8:30 in the morning...But it was a Friday and just that time of the year to let out your little demon.... hee hee.....


One year... in my twenties... I made myself into a Widow Bride. I drenched my (then) blonde hair with red mouse, packed on some HEAVY make-up and jazzed up one of those little shorty Dracula costumes (with the big collar). I had a super wide black stretchy belt I added tons of tullel to. I attached more tulle to a wide black headband, along with hot gluing a rhinestone necklace to it to make a veil. I added a black rose pin to the deep V. I attached jagged black sheer fabric to some opera length black satin gloves I had (from clubbing). And what's a bride without a huge bouquet (hey - It was the 90's!!), and huge faux diamond ring. Since I was at a club (and won Second Place in a costume contest) I spent the evening sipping champagne and saying, "Oh woe is me..." lol I placed second to a midget who had dressed as The Penguin from Batman. He had props too - he had a monocle (single eyeglass) and an open umbrella...


Me & Hope - 7th Grade

Costumes have come a long way since the days from throwing on a sheet and some fake blood or cutting up the bottom of moms long black dress to be Morticia from the Addams Family.

What are your Halloween plans? Will you dress up?
What do you want to be?


I think I'll always love this look...

HAPPY HALLOWEEN!


LINKING TO:


MORE THRIFTY TREATS: TOMBSTONES GHOSTS A CHANDELIER & A WITCH

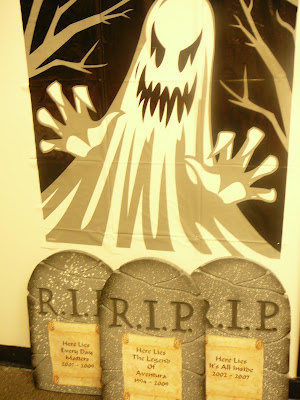
For thiese projects you can make like Martha and make them from scratch OR... make like Sandra Lee and make it Semi-Homemade. I saw potential in these simple RIP pre-made tombstones I picked up on sale last year at Party City for about $5 each. I already had some decorative paper with a scroll design on it... so I thought I could print some sayings on the paper and glue them to the space on the stones - which is what I did...


But these weren't just any sayings for Halloween. Since these were for a work party, and ironically it was going to be my last day, I gathered up the marketing ad slogans used during my sixteen years with the company (JCPenney). Here they are in no particular order, although I did include the years they were used in ad campaigns...

Here Lies The Legend of Aventura 1994 - 2009
(lol - that was me)


Sound familiar?

HA!

another HA!

Anyways...
I could have just left them the way they were, but I wasn't liking the way it looked like I just stuck something to the tombstone. So to help age its look, I used a trick I learned from an old worker of mine - Kathy. She was a master at spray painting props....


By spraying the edges with a mist of black, it helped add dimension.
And a trick to help blend and age the paper to the tombstone is called spitting.

It's a little harder to do with the new larger spray nozzles, but if you're using DESIGN MASTER SPRAY PAINT - don't press down all the way. Sort of tilt the nozzle back a bit and it spits. PRACTICE first on scraps to get the hang of it


DESIGN MASTER SPRAY PAINT is specially formulated to NOT eat away and melt Styrofoam. It's a craft paint and it can be used on paper, Styrofoam and even flowers (have you ever needed just the right shade of pink or coral and couldn't find it fresh? Get a color that's close or white and spray it.) I used it also on this black foamcore chandelier (I found online at Urban Outfitters for only $35). It was delivered broken - and the piece was missing. I traced one of the other good pieces onto black foam core. Although I did hot glue it, the seam was noticeable, so I used some black electrical tape over it, which helped re-enforce it as well (when hung in the space, you couldn't tell).


After the mess of making the props is done,
it was time to place them in the space...


You could set your tombstones in a grouping...
The ghost above is actually window decor - two panels for under $5.

Or use them to create scenes in your space...

Don't think this guy made it to Dancing With The Stars...


Lunchroom in process...

Simple vinyl covers, gauze runners, and the Jack-O-Centerpieces
actually help transform this space to the best it's ever looked...
(Now THAT is scary... lol)

And the chandelier helped dress the meeting room - adjacent to the lunchroom...


Getting the meeting room set up, I used some of the vinyl tablecover roll to create swags in the ceiling, leading to the chandelier...

(sorry the pic is fuzzy)
I set the meeting room tables zig-zag for a buffet luncheon. The round tables at the points gave extra table space for food. Plates, utensils, and desserts were on the other tables opposite the buffet.


The cats on the left & right were another package of two window decor  I picked up at Party City for under $5. The witch silhouette IS courtesy of Marth Stewart.com - I found it online last year. It's for a window. I used the same concept, and enlarged the image on the store copy machine. It was like a puzzle - I put together the pieces to make one large image. I spray mounted it to poster board. I cut out a template which I then used to trace onto black foamcore.


After cutting her out, I used a 36" round glass top to trace a circle for the moon (also cut from foamcore). I used square scraps behind each layer when I hot glued it all together to the one 8' x 4' sheet of black foamcore. Again, this helped to give the silhouette dimension... along with a few more bats. The spider web overlay is just a scrap of material I got at Jo Ann's fabrics and draped over orange satin cloths already on hand.


The associate hallway got a little spooky transformation as well.
I utilized some of the meeting room tables I had removed to create space inside - outside in the hall for (non-alcoholic) drinks. Old plexi inserts (on the wall) spelled out the upcoming event. I cut in half a bloody vinyl table cover to band the wall under the plexi. I gave a jagged cut to the bottom of edge of the black tablecovers. Ice filled coolers were stored under the tables. Cups and more bottle were above. Even the mens room door at the end of the hallway got a bloody door cover (I think it was only $3 at Party City).

To make some ghosts, I utilized some unsued display forms, tablecloths, newspaper and tape. I made a ball of newspaper, using masking tape to help maintain its shape. After I got the right size, I used an exacto blade to cut a whole on the bottom of the ball. The display form finial  (neck piece) was used for it to sit on. I secured it with more masking tape, draped the white cloth over it, and cut out poster board for black eyes I just pinned from outside. Eight of these were needing to get made, so after I made the first two, I asked my girls (the Visual Team) to make the others for the space.

I used another branch (I LOVE using branches!!) hung from the ceiling to hang the Happy Halloween banner from. This created a great little space as a backdrop for picture taking!

Yup... That's me and Jeff.
I was the "Legend of Aventura" and he was a Pirate...


Me and Jackie (as Cruella)


Me and my old boss on my last day....
Now he's a ghost... and I'm a witch.... lol

It was FUN decorating the space and it was also
Occupational Therapy... =) My costume was semi-home-made also... More about that in another post tomorrow...

Happy Halloween!!


LINKING TO:


THRIFTY TREATS: HALLOWEEN PARTY DECOR

Usually on Thursdays, I post about my latest thrift finds, how to refinish them, and how to use them in a space. This Thursday is more about being thrifty rather than going thrifting. Is the thought of Halloween happening in just a few days scaring the heck out of you? Are you going batty trying to figure out how to decorate for a party on a budget? Well fear not!! I'll be posting a few simple and rather thrifty DIY's I had made for a work Halloween party last year and these can help you set a scary stage...


Gather up a few small but wiry branches.
Spray paint them glossy black.

Cut out a few black bats
(well - actually a little more than a few - do the whole pack!!)
Good task to delegate to a helper if you have one... (hint-hint)

Pick up a few Jack-O-Lantern candy holders
(at any party store, Target, or Walmart)
While you're there, also pick up a few other goodies: bags of cobb web and some bags of spider rings. If you don't already have, you would also need to pick up some Styrofoam blocks to be glued inside Jack.


If you're making several of these for a party, it's best to build them as an assembly line process. Line up all your pumpkins and your supplies on your work table. And get your glue gun heated up and ready to go...

First, glue in your Styrofoam blocks.
Next, stick your branch clusters into the Styrofoam.
(if this will be outside and it's windy where you're at, you could fill with some stones to weigh it down.)

Use your cobb web as filler, and also drape some on the branches.
Hot glue your bats to the branches. Use two bats, stand back and take a look. If the size of your branches and pumpkins looks like it can take a third, add it.

Start adding your spider rings - a mix of orange & black is good.
Purple or lime green can also work with this project if the rest of your room decor is using it.

Spider rings easily attach to the cobb web and can also be just slipped onto the branches.You may need a few drops to hold them into the position you want. It's good to have their two front legs look like they are grasping something - like the branch or the web. And don't worry about the got glue strings - if any - it just looks like more spider web.

Stash your centerpieces until they are placed for your party.

They look cute to line up on tables or...

to use as centerpieces
like I did here for banquet style lunchroom tables.

A roll of black vinyl tale cover, and draped with a gauze runner is another inexpensive way to create a spooky look without scaring your wallet. One other way to add spooky pizazz to your space is with a scene roll (Party City - 50ft. for only $19.99 - Can be re-rolled and reused next year.) I used the haunted forest, and added the bats to it to give it more dimension.

For the tomb stones I set at the ends of the tables, I added some dancing skeletons (also picked up at the Dollar Store) for fun. I had pinned them to the wall, and added a few more bats (LOVE those bats!!)


Even those $5 tombstones also got
a little makeover... I'll post next.


Sorry I hadn't posted anything for the past few days. I had gotten caught up on a few projects. Then I saw a news report about Halloween costumes and it dawned on me: Halloween is this weekend!!
Where has the time gone?

What are you doing for Halloween?


Linking to:

LinkWithin

Related Posts with Thumbnails